Fresh Apple Sourdough Bread (Fermented Boule)
This post may contain affiliate links. Please read our disclosure policy.
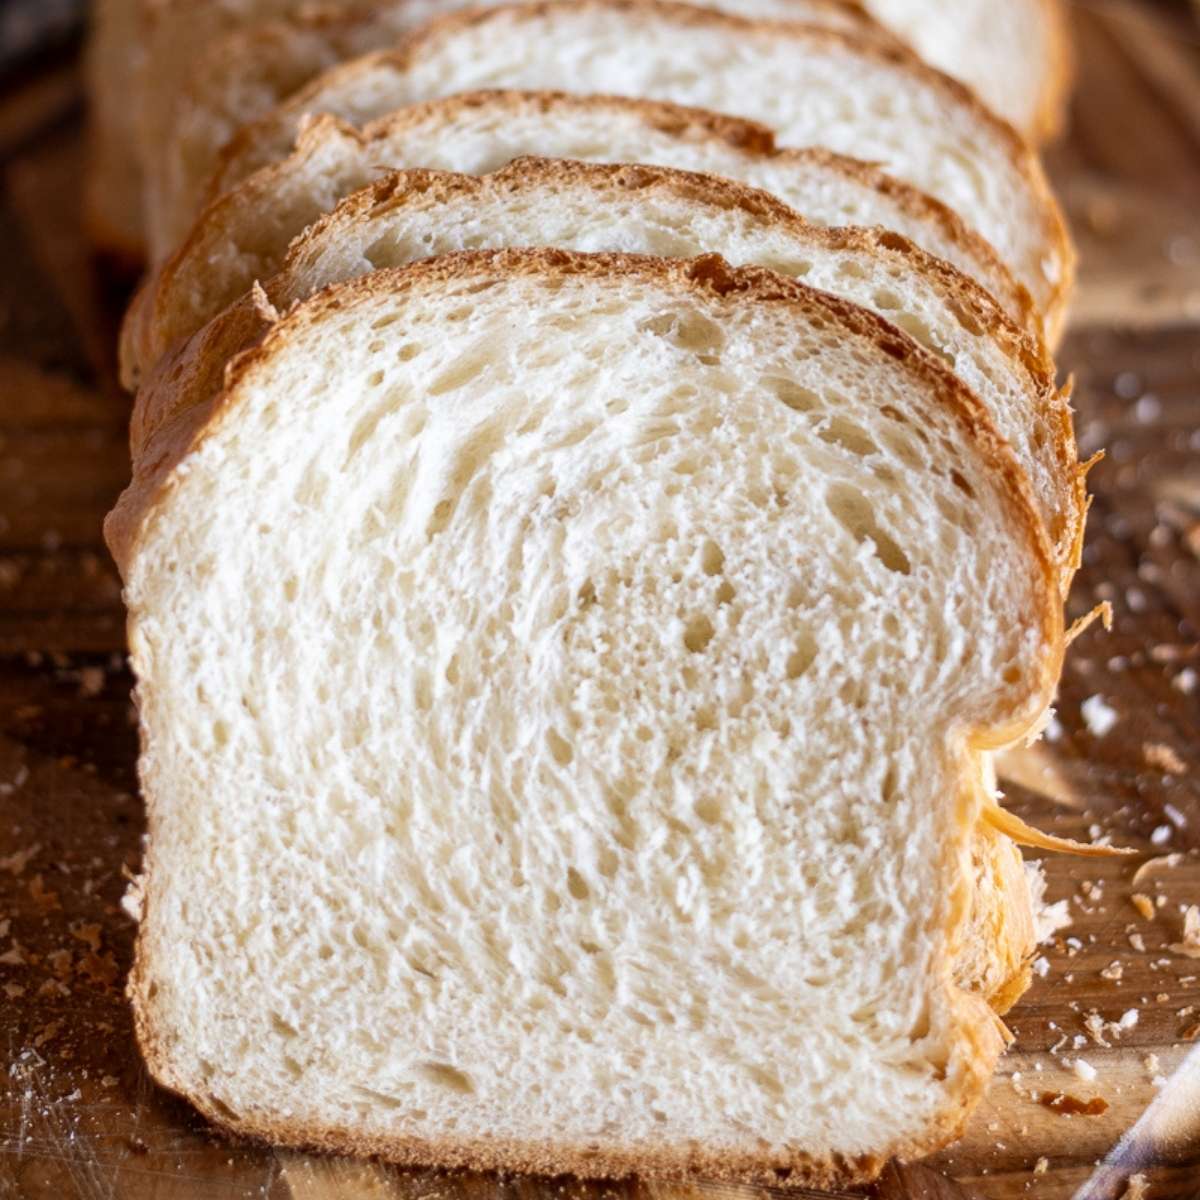
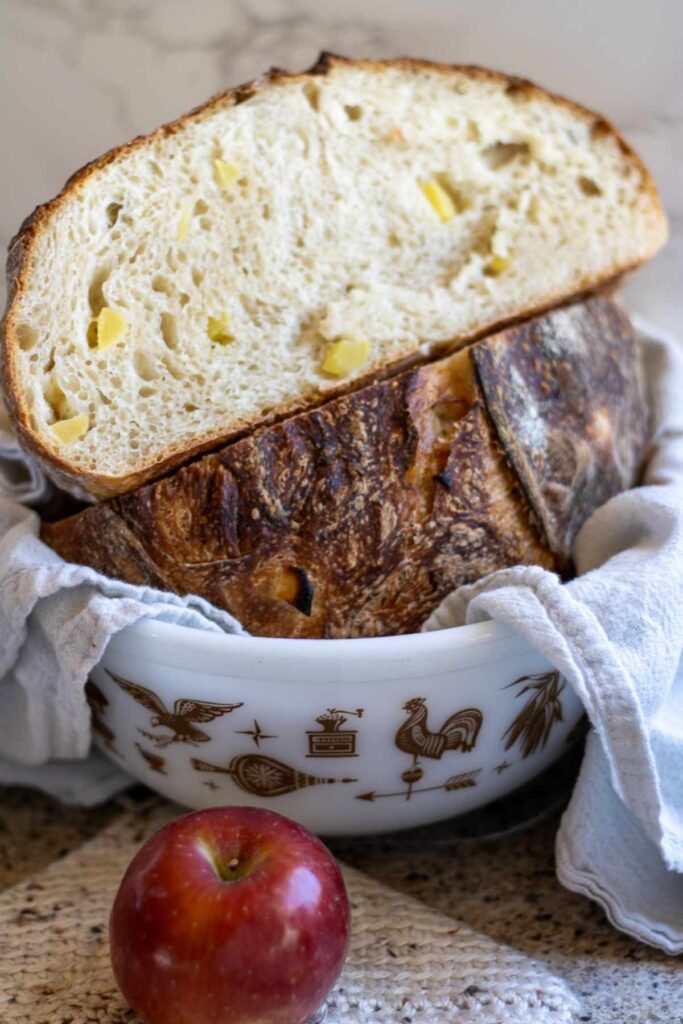
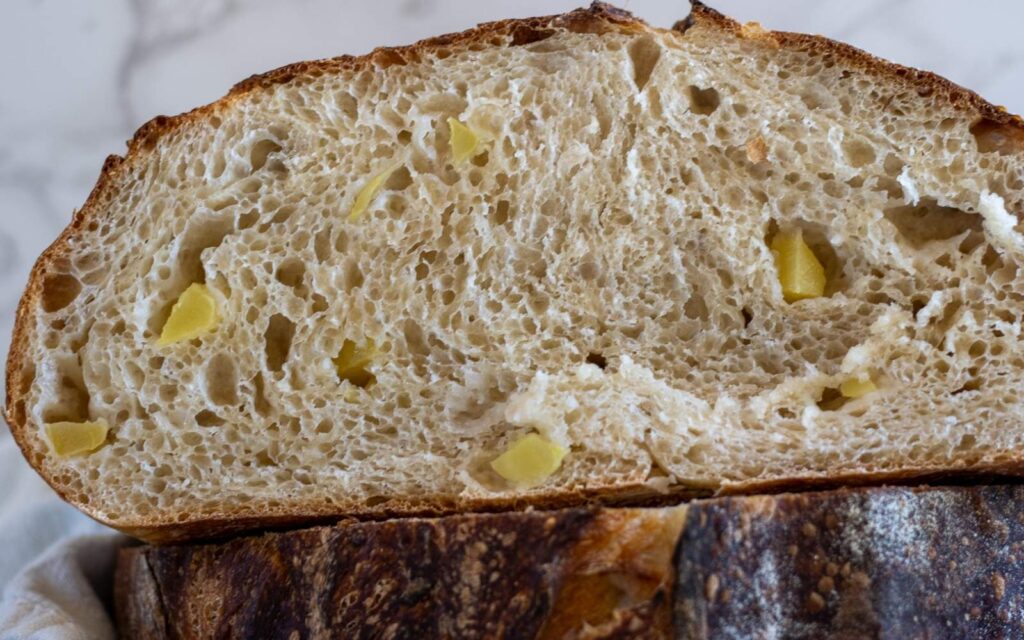
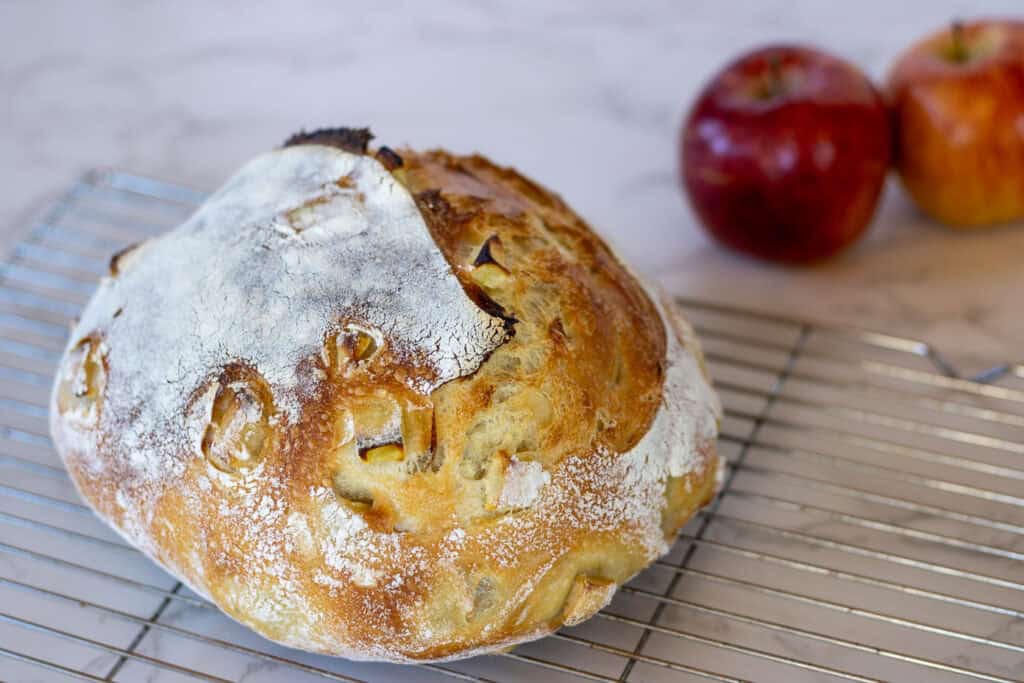
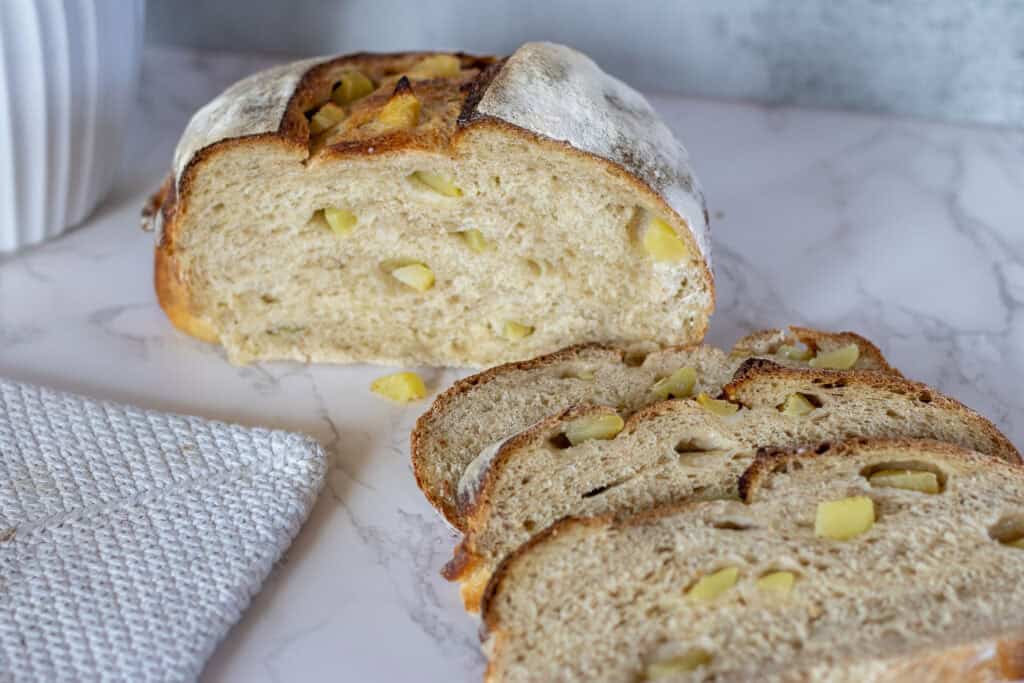
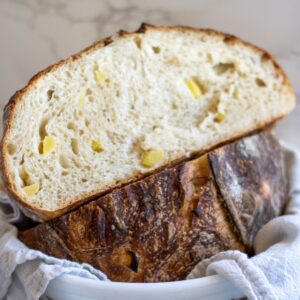
This apple sourdough bread is a naturally fermented boule with a crisp crust and a soft, flavorful crumb. Dotted with fresh chunks of apple—my new favorite inclusion—it’s subtly sweet with hints of brown sugar and vanilla. Perfect for toasting, snacking, or sharing!
Note: For those eager to dive straight into baking, click the “Jump to Recipe” button above to skip down to the printable recipe card.
A Fermented Sourdough Apple Bread
It ain’t quick-bread! This beautiful boule is fully fermented and rises with the leavening power of a ripe and bubbly sourdough starter. Perfect for bakers wanting to make a true sourdough bread boule with that artisan-style crumb.
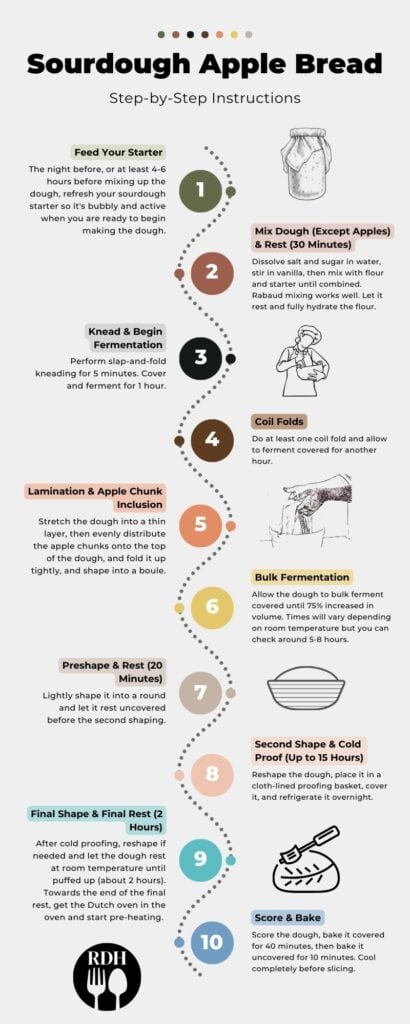
How To Make It Infographic
I made a handy chart for this fresh apple sourdough bread. This gives you a quick overview of each step in this recipe so you’ll know exactly what to do!
Ingredients & Equipment
This sourdough apple bread has a simple ingredient list, but a few things make it extra special!
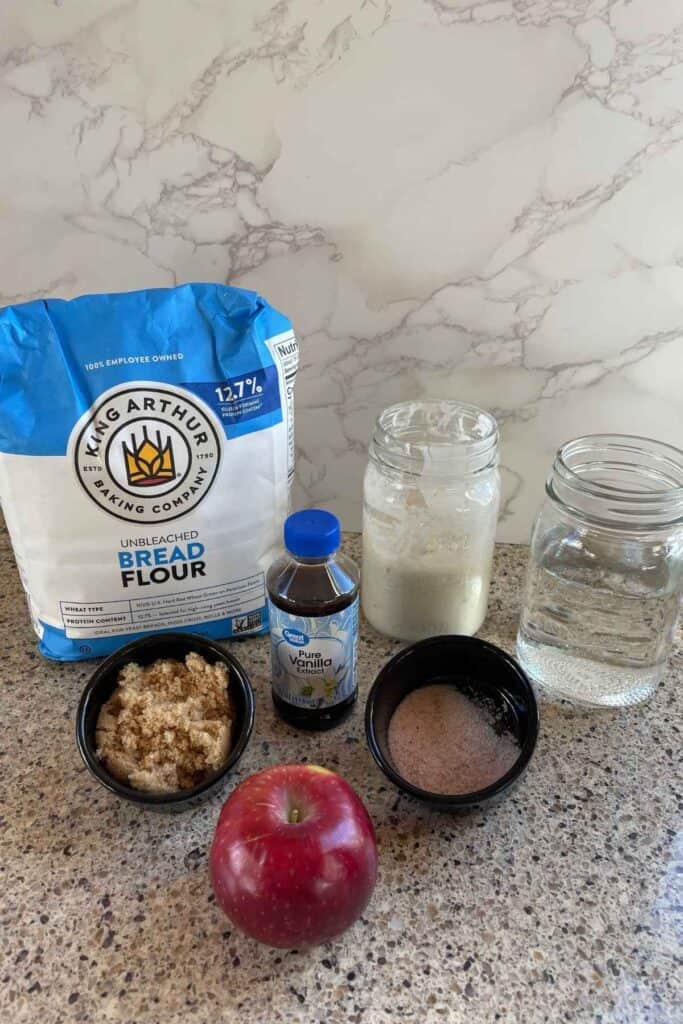
Key Ingredients
- Bread Flour – Provides the structure needed for a strong, airy loaf. I don’t recommend swapping for all-purpose flour, as it won’t develop gluten as well.
- Sourdough Starter – Make sure your starter is bubbly and active before mixing the dough. A sluggish starter can slow fermentation.
- Brown Sugar & Vanilla – These add a subtle warmth and depth to the bread without making it overly sweet.
- Apples – Choose a firm variety that holds its shape during baking. I used Cosmic Crisp, but Granny Smith, Honeycrisp, or Braeburn work great too.
Essential Equipment
- Dutch Oven – Helps trap steam for a crispy crust. If you don’t have one, use a baking stone and add a pan of hot water to the oven.
- Proofing Basket (Banneton) – Keeps the dough supported while it rises overnight. If you don’t have one, a bowl lined with a well-floured tea towel works too.
- Bench Scraper – Makes shaping and handling dough much easier, especially when dealing with a high-hydration sourdough.
- Lame (Bread Scoring Tool) – Allows for controlled expansion during baking. A sharp razor blade works in a pinch.
Mastering the Dough: Step-by-Step with Photos
Handling sourdough dough can seem tricky at first, but trust me—it’s way easier than it looks! A quick video tutorial is all you need to get the hang of techniques like the Rubaud method, slap and folds, coil folds, and lamination. Below, I’ll walk you through these steps with photos, share some tips, and recommend videos so you can see them in action. Once you try them, you’ll realize they’re surprisingly simple!
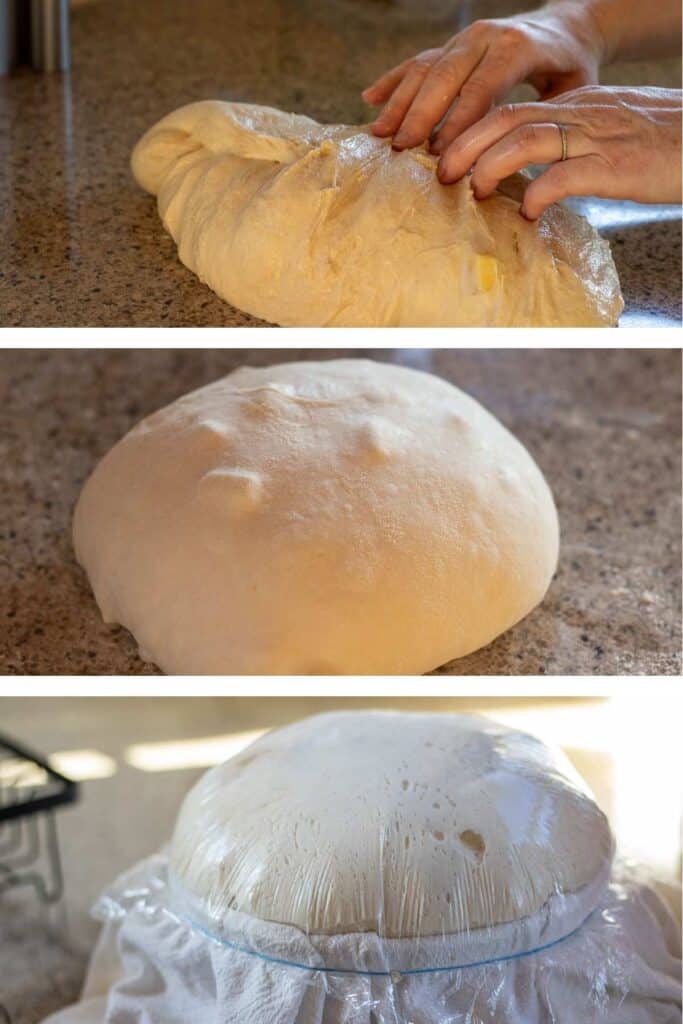
📸 Dough Handling Techniques (First Gallery – 6 Photos)
In this set of photos, we’ll cover four important dough-handling techniques, plus adding the apples during lamination:
 slap and fold
- coil fold and lamination
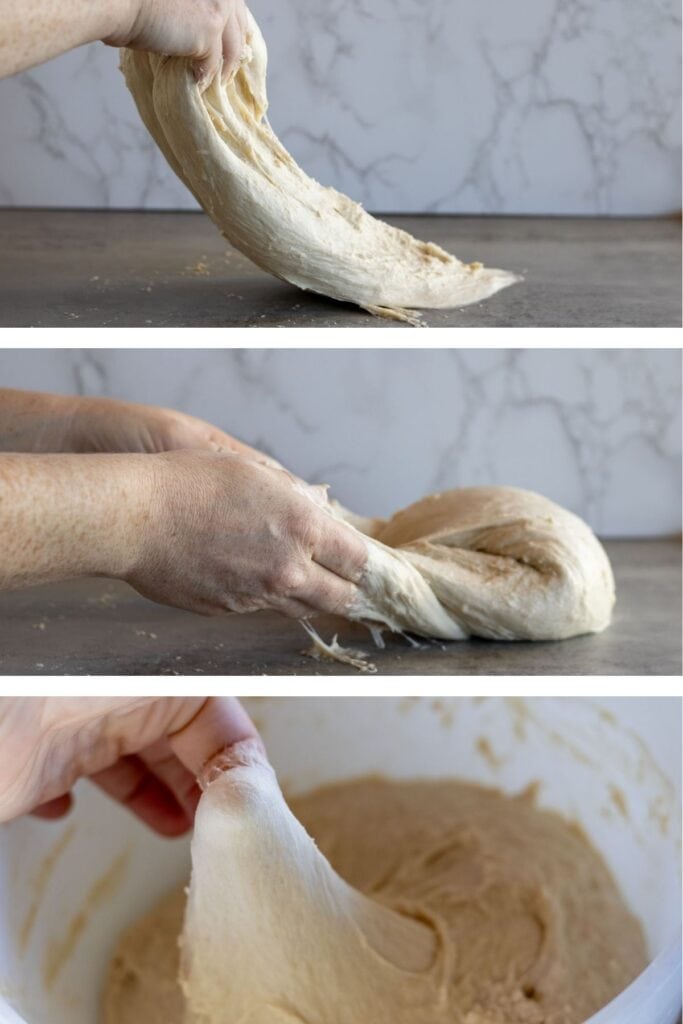
- Rubaud Method – This technique is used to mix the initial dough and develop gluten strength right from the start. With wet hands, reach down the side of the bowl, scoop the dough up, stretch it slightly, and then let it fall back. Repeat this rhythmic motion for several minutes. It’s like giving your dough a gentle workout!
- Slap and Folds – This helps further develop gluten and strengthen the dough. Pick up the dough, slap it down onto the counter, and fold it over itself. Repeat for a few minutes—it’s oddly satisfying!
- Coil Folds – A gentler method to build strength during fermentation. Gently lift the dough from the center, let one side tuck under itself, then repeat for the other side. Think of it as giving your dough a little stretch-and-tuck hug.
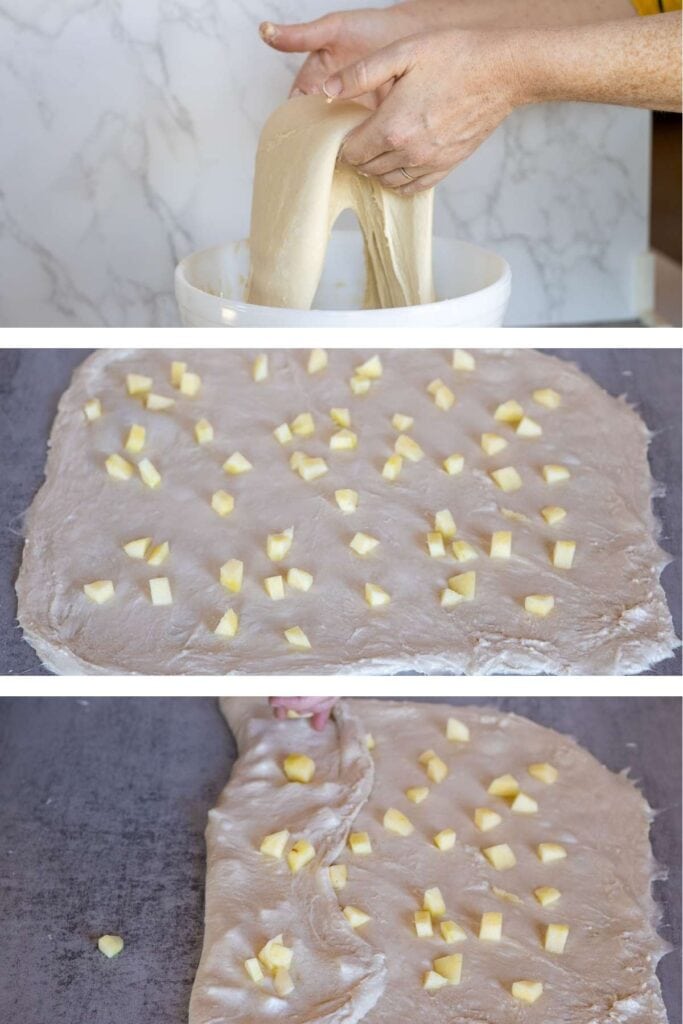
- Lamination & Adding Apples – Here’s where things get fun! Gently stretch the dough out into a large, thin sheet. Evenly spread the apple pieces across the surface, then fold the dough back onto itself. This helps evenly distribute the fruit without deflating your dough.
💡 Pro Tip: If your dough feels too sticky to handle, lightly wet your hands—it makes all the difference!
🔗 Recommended Videos:
- Rubaud Mixing Method for Sourdough Bread
- Slap and Folds Tutorial
- Coil Folds Explained
- Lamination for Sourdough
📸 Shaping the Dough (Second Gallery – 6 Photos)
Once the bulk fermentation is done, it’s time to shape your bread! This gallery will show you how to form a beautiful boule (round loaf) and get your dough ready for its final rise.
- shaping before bulk
- second shape then overnight proofing
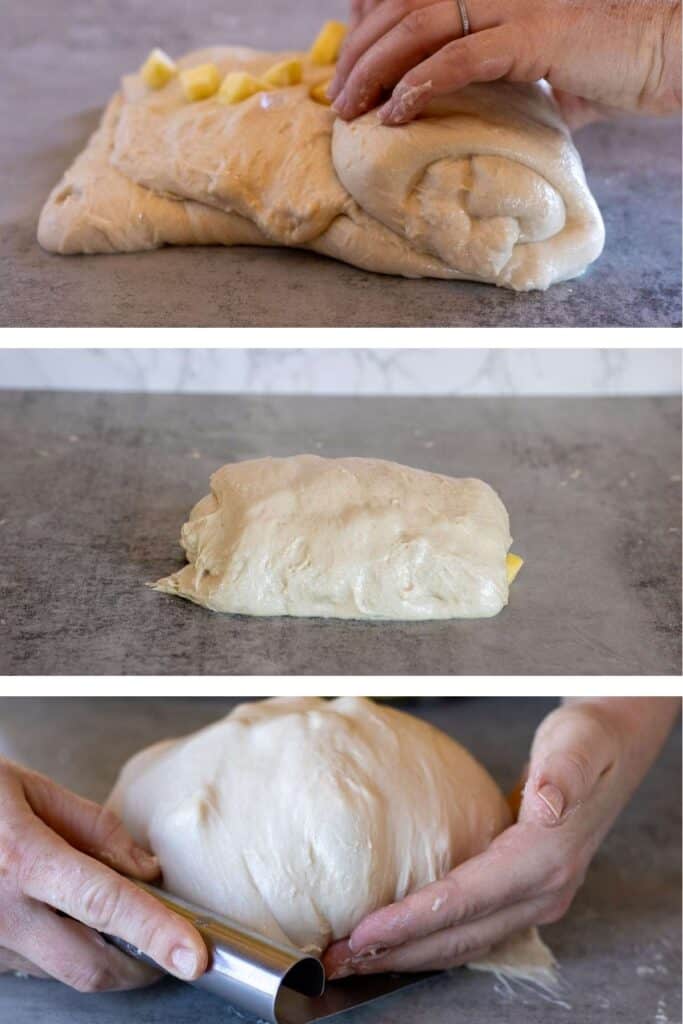
- Shaping the Boule – Using a bench scraper can be super helpful here. Gently tighten the dough into a round shape by pulling it toward you while rotating slightly.
- Reshaping After Bulk Ferment – After a long ferment, the dough may spread out and feel relaxed—this step helps bring it back to life before its final proof.
- Post-Ferment Dough Check – As you’ll see in my photo, my dough nearly escaped the bowl! Make sure your proofing basket is large enough to handle the expansion unless you want a dough volcano on your counter.
💡 Pro Tip: A light misting of water on the bench helps prevent sticking while shaping. You can also dust it with flour.
🔗 Recommended Videos:
📸 The Grand Finale: Scoring & Baking (Final Gallery – 3 Photos)
Now for the moment of truth—shaping, scoring, and baking your masterpiece!
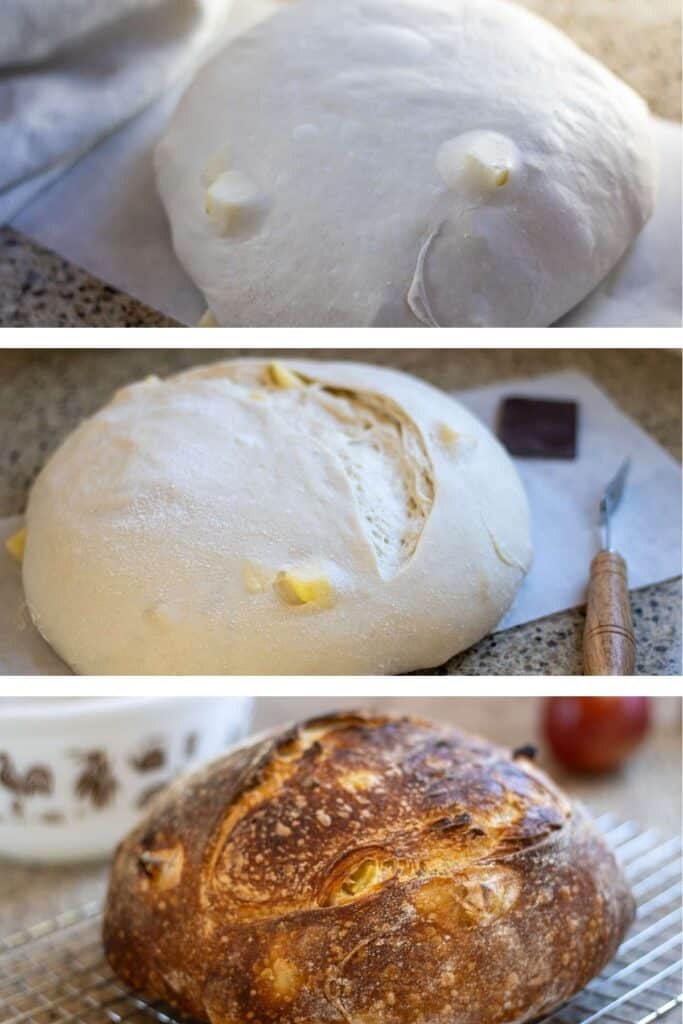
- Final Shape – This is the last step before scoring, ensuring the dough holds its structure.
- Scoring – Using a sharp lame or razor, make confident cuts to allow for proper expansion in the oven.
- The Perfect Bake – Golden, crisp, and full of apple goodness—your sourdough apple bread is finally ready to enjoy!
💡 Pro Tip: If you’re new to scoring, start with a simple single slash before experimenting with fancy designs.
🔗 Recommended Videos:
Now, go forth and bake some amazing sourdough! 🍏🔥
A Word on Apple Varieties in Sourdough Bread
Choosing the right apples for your sourdough bread can make a big difference in taste and texture. Different apples bring unique flavors and moisture levels, which can affect how your bread turns out.
How Apples Affect Your Sourdough
- Flavor: Tart apples like Granny Smith add a zesty kick, balancing the bread’s natural sourness. Sweeter apples, such as Honeycrisp or Fuji, bring more sweetness to each bite.
- Texture: Firm apples hold their shape during baking, giving you delightful apple chunks throughout the loaf. Softer apples might break down, blending into the bread and changing its texture.
- Moisture: Juicy apples can release liquid into the dough, potentially making it wetter. It’s a good idea to adjust your dough’s hydration if you’re using particularly juicy apples to keep the right consistency.
Apple Varieties to Consider
Here are some apple types that work well in sourdough baking:
- Granny Smith: These green apples are tart and firm, holding up well during baking. They add a nice contrast to the bread’s flavor.
- Honeycrisp: Known for their sweet-tart flavor and crisp texture, Honeycrisps provide a pleasant sweetness without overpowering the bread.
- Braeburn: With a balance of sweetness and acidity, Braeburns offer a complex flavor and stay firm when baked.
- Pink Lady (Cripps Pink): These apples are sweet with a hint of tartness and have a firm texture, making them great for baking.
My Experience with Cosmic Crisp Apples
In my sourdough apple bread, I used a heaping cup of Cosmic Crisp apples, diced into ½-inch cubes. Cosmic Crisps are celebrated for their sweetness, juiciness, and crispness. They added a lovely flavor and texture to the bread without messing with the dough’s consistency.twopinkpeonies.com
Feel free to experiment with different apple varieties to find your favorite combination.
Sourdough Scheduling Example
This is just the schedule I followed for my sourdough apple bread, but keep in mind—your timeline might look a little different! Sourdough is flexible, and things like your home temperature, the type of apples you use, and the strength of your starter can all affect the timing. Don’t stress about following this exactly—adjust as needed to fit your own baking conditions.
My Sourdough Apple Bread Timeline
- (Night Before) – Feed starter
- 10:00 AM – Mix the dough
- 10:30 AM – Let the dough rest (30 minutes)
- 11:00 AM – Slap and fold for 5 minutes, then let it ferment for 1 hour
- 12:00 PM – Coil fold, then another 1-hour ferment
- 1:00 PM – Laminate the dough, add the apples, and start bulk fermentation (5 hours)
- 6:00 PM – Preshape, second shape, then cover and refrigerate overnight
- 8:00 AM (Next Morning) – Reshape if needed, cover with a tea towel, and let it rest for 2 hours
- 10:00 AM – Score and bake!
This schedule worked well for me, but feel free to tweak it based on your dough’s behavior. Happy baking!
Frequently Asked Questions (FAQs)
I don’t recommend substituting all-purpose flour for bread flour in this sourdough apple bread recipe. Bread flour has a higher protein content (12-14%) compared to all-purpose flour (9-12%), which contributes to better gluten development. This results in a chewier texture and improved rise in your bread. Using all-purpose flour may lead to a denser loaf with a tighter crumb.
Yes, cinnamon contains antimicrobial properties that can slow down yeast activity, thereby inhibiting fermentation. To minimize this effect, it’s advisable to add cinnamon during the lamination or shaping stage rather than incorporating it directly into the dough. However, in my experience, adding cinnamon during lamination didn’t yield the best results, but it can be done if desired.
Substituting whole wheat flour for bread flour will affect the texture and flavor of your bread. Whole wheat flour absorbs more water and produces a denser loaf due to its higher fiber content. If you prefer a lighter texture, consider using a mix of whole wheat and bread flour.
Proper fermentation is indicated by dough that has risen noticeably and exhibits a slightly domed surface. It should feel airy and show bubbles on the surface or sides. Over-fermentation can lead to a sour taste and weakened gluten structure, resulting in a flat loaf.
Yes, you can customize your sourdough apple bread by adding nuts like walnuts or pecans, or other dried fruits such as raisins or cranberries. Introduce these additions during the lamination or folding stages to ensure even distribution without disrupting the dough structure.
If the bottom of your bread is browning too much in the Dutch oven, try lining it with a thin layer of rice and placing a small square of aluminum foil on top before adding your dough. The rice acts as insulation and helps distribute heat more evenly, preventing excessive browning.
Placing your dough on a sheet of parchment paper makes transferring it into the Dutch oven so much easier! Simply lift the edges of the parchment and lower the dough into the pot—no need to struggle with flipping or burning your fingers on a hot Dutch oven. The parchment can stay in while baking, and it won’t affect the final crust.
Storage and Freezing Instructions
Storing Sourdough Apple Bread
- At Room Temperature: Once the bread has completely cooled, store it in a paper bag or wrapped in a clean kitchen towel. This helps maintain the crust’s texture while preventing excessive moisture loss. Avoid storing in plastic bags, as they can make the crust soggy. Consume within 2-3 days for optimal freshness.
- In the Refrigerator: Refrigeration is not recommended for sourdough bread, as it can cause the bread to stale faster.
Freezing Sourdough Apple Bread
- Whole Loaf: Allow the bread to cool completely. Wrap it tightly in aluminum foil or plastic wrap, then place it in a freezer-safe bag. Label with the date and freeze for up to 3 months.
- Sliced Bread: Slice the cooled bread and place parchment paper between slices to prevent sticking. Wrap tightly and store in a freezer-safe bag. This allows you to thaw individual slices as needed.
Thawing and Reheating
- Thawing: Remove the bread from the freezer and let it thaw at room temperature, still wrapped, to prevent condensation from making the crust soggy.
- Reheating: To refresh the crust, preheat your oven to 350°F (175°C). Unwrap the thawed bread and place it directly on the oven rack for 10-15 minutes. For slices, reduce the time to 5-10 minutes.
Proper storage ensures your sourdough apple bread remains delicious and maintains its texture, allowing you to enjoy it over several days or weeks.
Fresh Apple Sourdough Bread (Fermented Boule)
Equipment
- Mixing bowl
- Sourdough proofing cloth-lined baskets or bowls with tea towels
- Bread lame or a razor blade for scoring
- Beeswax wraps or plastic wrap for covering dough
- Large bread knife
Ingredients
- 300 grams water 1 and 1/3 cup
- 7 grams salt 1 teaspoon
- 55 grams brown sugar light or dark, 3 Tablespoons
- 5 grams vanilla extract 1 teaspoon
- 500 grams bread flour divided, 3 and 1/2 cups
- 150 grams sourdough starter bubbly
- 1 cup apple chunks, peeled and chopped heaping cup of 1/2 inch chunks
Instructions
- Dissolve the salt and sugar into the water and stir in the vanilla. Add half of the flour and mix the dough thoroughly using a spoon. Add the ripe sourdough starter and vigorously mix with the spoon for 3 minutes.
- Add the rest of the flour, pinching and squeezing it into the dough until it has thoroughly come together. Use the Rabaud method of mixing sourdough for 3 minutes, then cover and rest for 30 minutes.
- Mist your work surface with water and turn out the dough. Use a wet hand to knead the dough, using the slap-and-fold method. After 5 minutes of working the dough, use a bench scraper to shape it into a boule. Cover and ferment for 1 hour.
- Do a coil fold, then cover and ferment for one more hour.
- Mist your working surface and laminate the dough. To do this, gently stretch the dough into a large, thin square. Work your way around the edges, lifting and pulling carefully until the dough is stretched as far as possible without tearing. See the process photos for guidance. Spread half the apple chunks evenly across the dough.Fold the dough like an envelope into thirds, taking the left side of the dough and folding it over to the center, adding more apples, then taking the right side and folding it over the left, adding the remaining apples. Then, roll or fold the bottom of the dough towards the top. Shape the dough into a round boule, tightening it as you pull it towards yourself. Cover and bulk ferment for 5 to 8 hours or until it has increased in volume by 75%.
- Flour the top of the dough and turn it out onto the counter for preshaping. To do this, slightly flatten it out by pressing with your fingers, then take the right upper edge of the dough and fold it over while grabbing the left upper edge and folding it over in a stitching movement, pinching it together. Repeat this movement for the lower edges. Then, grab the bottom edge and tuck the dough into a ball, rolling it up from the bottom to the top. Rest uncovered for 20 minutes.
- Flip the dough over and do another shape, pinching and sealing the seam. Coat the shaped boule in flour and place it seam-side up in a lightly dusted cloth-lined proofing basket. Cover and proof overnight (up to 15 hours) in the refrigerator.
- Do a final shape and place the dough on a piece of parchment paper to rest for another 2 hours at room temperature. Place a layer of rice on the bottom of a Dutch oven, fold a square of aluminum foil, and place it on top of the rice. Near the end of the 2 hours, place the Dutch oven inside the oven and get it preheating to 450F (232C). Always use heavy-duty oven mitts when working with a hot Dutch oven!
- Score the dough, then lift the parchment paper, with the boule, and place it into the Dutch oven. Bake with the lid on for 40 minutes. Using an oven mitt, remove the Dutch oven lid, and bake uncovered for another 10 minutes.
- Allow the bread to cool on a wire rack for 2 hours before using a sharp bread knife to slice and serve.
Notes
- Combine all the dough ingredients (except the apple chunks)
- Rest 30 minutes
- Slap and folds for 5 minutes
- 1 hour ferment
- 3 to 4 coil folds
- 1 hour ferment
- Lamination stretch, add apple chunks, fold up, and shape
- Bulk ferment
- Preshape
- Shape, cover, and proof in the refrigerator overnight or up to 15 hrs
- Final shape
- Rest 2 hours at room temp
- Score and bake
Nutrition
More Fermented Sourdough Recipes
Love this recipe? If you’re into naturally fermented breads, be sure to check out my collection of sourdough recipes for more delicious, slow-fermented bakes!
If you’ve tried this Artisan Apple Bread Recipe, remember to rate it and let me know how you got on in the comments below. I love hearing from you, and it helps me so much! — Thank you.
Baking Tips & Troubleshooting Sourdough
Sourdough can be unpredictable, but here are three key tips to keep your bake on track!
Why is my dough spreading instead of holding shape? It might need more gluten strength—make sure to do your folds during bulk fermentation. If it’s over-proofed, the gluten starts breaking down, so try shortening fermentation next time. If your dough feels too wet, reduce hydration slightly.
Why is my bread dense or flat? Under-proofing can lead to a dense loaf, while over-proofing weakens the structure. Try the poke test—press the dough lightly. If it springs back slowly but leaves a small dent, it’s ready to bake.
Why isn’t my crust crispy? Steam is key! Bake in a Dutch oven or add a tray of hot water to your oven. Let your loaf cool completely before slicing—cutting too soon can soften the crust.
Sourdough is all about practice and patience—keep tweaking, and you’ll get the perfect loaf!